Installers should be craftsmen with construction experience. Installers should read the instructions. Follow all OSHA and other safety requirements. StonePly panels are a finished natural stone product. Use care to protect them during installation.
Installation Supplies and Tools
Installation Supplies
Glazier's horseshoe-shaped plastic shims 1/16", 1/8", & 1/4" thick by 2.5" long
No. 8 stainless steel bi-metal screws with 300 series shaft and 400 series self-tapping tip, Pan Head
Masking tape
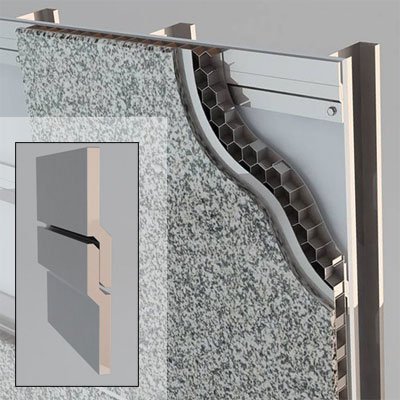
Interlocking Channel
PL Premium Adhesive
Installation Tools
Screw gun with clutch
Saw to cut shims
Drill and bits
48" level and 24" level
Circular saw with a wet cut, smooth rim, diamond-tipped blade
Framing Construction
Steel stud or furring should
be true and plumb
must have a maximum deflection limited to L/240, not to exceed allowable stresses
Lateral support and bridging should be installed. Do not rely on StonePly stone panels to provide lateral support for wall framing.
The steel stud framing should have a maximum variation from a true plan of 1/8 inch in 10 feet. Correct any defects prior to proceeding with stone panel installation. Framing studs must be located with studs at panel joint locations.
Panel Storage, Staging, and Handling
Stone panels should be stored in a clean, dry area. While StonePly panels are strong and impact resistant, keep in mind that they are a finished product. The natural stone facing can be chipped at the edges and softer stones can be scratched. Limestone, marble, travertine, and other softer stones can be stained by dirt, mud, or construction materials. As they are removed from their crates, StonePly stone panels should be placed on carpet, foam, or other padded surface to protect the stone edges. Also consider laying the uncrated stone panels out in the order they are to be installed to speed up the process and minimize mistakes.
Installing
Use the shop drawings, tape, and laser level to mark the exact positions of panels on the wall.
Check to ensure that each panel edge will have framing support. Using a laser, find the most outward point of the framing. This will be the installing "plane," as all other panels will need to be shimmed out to that level.
Use string lines or a rotating laser, set at least two inches from the most outward point of the framing as a reference line to establish the plane for the entire StonePly stone panel faces.
Starting with the bottom row, position the interlocking channel sections on the wall as indicated by the shop drawings.
Using the C-clamps, clamp the interlocking channel section into place on the aluminum or steel framing and screw the interlocking channel sections onto the steel framing. Do not exceed a maximum of 24" on center between interlocking channel. If steel framing is to be in direct contact with aluminum interlocking channels in a damp location, use paint or a similar barrier between the dissimilar metals to prevent corrosion.
Tips
Start with the bottom row of stone panels and work up.
To attach the interlocking channel to the panels, lay panel face down. Mark the interlocking channel locations and attach the interlocking channel to the back of the panel with a bead of PL Premium Adhesive and #8 stainless steel metal screws.
When installing the screws, use a drill/drive with a clutch to control torque.
Installation can progress vertically or horizontally depending on how the stone panels are lain out.
Use care when aligning stone panel joints.
Use spacers between the panels to maintain joint width.
Disclaimer and Warning
These are general guidelines, not full instructions. Every job is different and a competent, experienced professional, skilled in construction, carpentry, safety and proper use of tools should direct the work. Consult with a professional engineer to produce calculation and recommendations for fastener spacing to meet wind loading and anchor spacing.